本文简要介绍 SeaweedFS 的搭建指南,以及使用方法。搭建部分主要参考这篇文章 。本文基于以下版本:
1
2
3
Go 1.17.5 SeaweedFS 2.84 Redis 6.2.6
安装完成后,master的运行服务如下:
所有worker的运行服务如下:
1 2 3 weed-volume weed-filer weed-s3
准备工作
我们在这里准备了四台机器,一台master与三台worker,已经全部配置好hosts。
安装Go
请参考官网的安装教程 。命令简要列举如下:
1 2 wget https://go.dev/dl/go1.17.5.linux-amd64.tar.gz rm -rf /usr/local/go && tar -C /usr/local -xzf go1.17.5.linux-amd64.tar.gz
将以下命令添加到/etc/profile:
/etc/profile 1 export PATH=$PATH :/usr/local/go/bin
Go需要在所有机器上安装。
安装Redis
我们使用Redis存储文件映射关系。安装请参考官网的安装教程 。命令简要列举如下:
1 2 3 4 5 6 yum -y install gcc mkdir /datawget http://download.redis.io/redis-stable.tar.gz tar xvzf redis-stable.tar.gz -C /data cd /data/redis-stablemake install
如果遇到 zmalloc.h:50:31: fatal error: jemalloc/jemalloc.h: No such file or directory 错误,请执行 make distclean && make install。
然后继续执行:
1 2 3 4 5 mkdir /etc/redismkdir /var/rediscp /data/redis-stable/utils/redis_init_script /etc/init.d/redis_6379cp /data/redis-stable/redis.conf /etc/redis/6379.confmkdir /var/redis/6379
修改配置文件:
/etc/redis/6379.conf 1 2 3 4 5 6 7 8 9 10 11 12 13 14 15 16 17 18 19 20 21 22 23 24 25 26 27 28 29 30 31 32 33 34 35 36 37 38 39 40 41 42 43 44 45 46 47 48 49 # ... # IF YOU ARE SURE YOU WANT YOUR INSTANCE TO LISTEN TO ALL THE INTERFACES # JUST COMMENT OUT THE FOLLOWING LINE. # ~~~~~~~~~~~~~~~~~~~~~~~~~~~~~~~~~~~~~~~~~~~~~~~~~~~~~~~~~~~~~~~~~~~~~~~~ - bind 127.0.0.1 -::1 + # bind 127.0.0.1 -::1 # ... # By default protected mode is enabled. You should disable it only if # you are sure you want clients from other hosts to connect to Redis # even if no authentication is configured, nor a specific set of interfaces # are explicitly listed using the "bind" directive. - protected-mode yes + protected-mode no # ... # By default Redis does not run as a daemon. Use 'yes' if you need it. # Note that Redis will write a pid file in /var/run/redis.pid when daemonized. # When Redis is supervised by upstart or systemd, this parameter has no impact. - daemonize no + daemonize yes # ... # Specify the log file name. Also the empty string can be used to force # Redis to log on the standard output. Note that if you use standard # output for logging but daemonize, logs will be sent to /dev/null - logfile "" + logfile "/var/log/redis_6379.log" # ... # The working directory. # # The DB will be written inside this directory, with the filename specified # above using the 'dbfilename' configuration directive. # # The Append Only File will also be created inside this directory. # # Note that you must specify a directory here, not a file name. - dir ./ + dir /var/redis/6379 # ... # IMPORTANT NOTE: starting with Redis 6 "requirepass" is just a compatibility # layer on top of the new ACL system. The option effect will be just setting # the password for the default user. Clients will still authenticate using # AUTH <password> as usually, or more explicitly with AUTH default <password> # if they follow the new protocol: both will work. # # The requirepass is not compatable with aclfile option and the ACL LOAD # command, these will cause requirepass to be ignored. # - # requirepass foobared requirepass redisredisredis # ...
最后执行:
1 2 3 systemctl daemon-reload systemctl start redis_6379 systemctl enable redis_6379
Redis只需要在master上安装。
配置防火墙
在master节点开启以下配置(IP段需要自行修改):
1 2 3 4 5 firewall-cmd --permanent --add-rich-rule='rule family="ipv4" source address="xxx.xxx.xxx.0/24" port protocol="tcp" port="6379" accept' firewall-cmd --permanent --add-rich-rule='rule family="ipv4" source address="xxx.xxx.xxx.0/24" port protocol="tcp" port="9333" accept' firewall-cmd --permanent --add-rich-rule='rule family="ipv4" source address="xxx.xxx.xxx.0/24" port protocol="tcp" port="19333" accept' firewall-cmd --reload firewall-cmd --list-all
在worker节点开启以下配置(IP段需要自行修改):
1 2 3 4 5 6 7 firewall-cmd --permanent --add-rich-rule='rule family="ipv4" source address="xxx.xxx.xxx.0/24" port protocol="tcp" port="8080" accept' firewall-cmd --permanent --add-rich-rule='rule family="ipv4" source address="xxx.xxx.xxx.0/24" port protocol="tcp" port="18080" accept' firewall-cmd --permanent --add-rich-rule='rule family="ipv4" source address="xxx.xxx.xxx.0/24" port protocol="tcp" port="8888" accept' firewall-cmd --permanent --add-rich-rule='rule family="ipv4" source address="xxx.xxx.xxx.0/24" port protocol="tcp" port="18888" accept' firewall-cmd --permanent --zone=public --add-port=80/tcp firewall-cmd --reload firewall-cmd --list-all
如果嫌麻烦可以直接关闭防火墙:
1 2 systemctl stop firewalld.service systemctl disable firewalld.service
安装SeaweedFS
首先需要在所有机器上下载SeaweedFS并且创建所需目录。命令如下:
1 2 3 4 5 wget https://github.com/chrislusf/seaweedfs/releases/download/2.84/linux_amd64.tar.gz mkdir /data/weedtar zxvf linux_amd64.tar.gz -C /data/weed/ mkdir /data/weed/metamkdir /data/weed/data
随后分别配置master与worker。我们在master安装weed-master,在worker安装weed-volume、weed-filer与S3网关。
在master节点安装weed-master
首先直接新建以下文件配置服务,其中IP地址根据你的设置自行更改:
/usr/lib/systemd/system/weed-master.service 1 2 3 4 5 6 7 8 9 10 11 12 13 14 15 [Unit] Description=SeaweedFS Master After=network.target [Service] Type=simple User=root Group=root ExecStart=/data/weed/weed -v=0 master -ip=master -port=9333 -defaultReplication=001 -mdir=/data/weed/meta WorkingDirectory=/data/weed SyslogIdentifier=seaweedfs-master [Install] WantedBy=multi-user.target
随后运行以下命令开启服务:
1
2
3
systemctl daemon-reload systemctl start weed-master systemctl enable weed-master
在worker节点安装weed-volume,weed-filer与S3网关
直接新建以下文件配置服务,其中IP地址与mserver地址根据你的设置自行更改:
/usr/lib/systemd/system/weed-volume.service 1 2 3 4 5 6 7 8 9 10 11 12 13 14 15 [Unit] Description=SeaweedFS Volume After=network.target [Service] Type=simple User=root Group=root ExecStart=/data/weed/weed -v=0 volume -mserver=master:9333 -ip=[worker] -port=8080 -dir=/data/weed/data -dataCenter=dc1 -rack=rack1 WorkingDirectory=/data/weed SyslogIdentifier=seaweedfs-volume [Install] WantedBy=multi-user.target
然后运行以下命令生成filer配置文件:
1 /data/weed/weed scaffold -config filer -output="/data/weed/"
编辑此文件,配置[redis2]部分:
/data/weed/filer.toml 1 2 3 4 5 6 7 8 9 10 11 12 13 14 15 16 17 18 19 # ... [leveldb2] # local on disk, mostly for simple single-machine setup, fairly scalable # faster than previous leveldb, recommended. - enabled = true + enabled = false dir = "./filerldb2" # directory to store level db files # ... [redis2] - enabled = false - address = "localhost:6379" - password = "" + enabled = true + address = "master:6379" + password = "redisredisredis" database = 0 # This changes the data layout. Only add new directories. Removing/Updating will cause data loss. superLargeDirectories = [] # ...
新建以下文件配置服务,其中master地址根据你的设置自行更改:
/usr/lib/systemd/system/weed-filer.service 1 2 3 4 5 6 7 8 9 10 11 12 13 14 15 [Unit] Description=SeaweedFS Filer After=network.target [Service] Type=simple User=root Group=root ExecStart=/data/weed/weed -v=0 filer -master=master:9333 -port=8888 -defaultReplicaPlacement=001 WorkingDirectory=/data/weed SyslogIdentifier=seaweedfs-filer [Install] WantedBy=multi-user.target
随后运行以下命令开启服务:
1 2 3 4 5 systemctl daemon-reload systemctl start weed-volume systemctl enable weed-volume systemctl start weed-filer systemctl enable weed-filer
接下来配置S3网关。首先建立如下文件并写入内容:
/data/weed/config.json 1 2 3 4 5 6 7 8 9 10 11 12 13 14 15 16 17 18 19 20 21 22 23 24 25 26 { "identities" : [ { "name" : "anonymous" , "actions" : [ "Read" ] } , { "name" : "root" , "credentials" : [ { "accessKey" : "testak" , "secretKey" : "testsk" } ] , "actions" : [ "Admin" , "Read" , "List" , "Tagging" , "Write" ] } ] }
新建以下文件配置服务,其中master地址根据你的设置自行更改:
/usr/lib/systemd/system/weed-s3.service 1 2 3 4 5 6 7 8 9 10 11 12 13 14 15 [Unit] Description=SeaweedFS S3 After=network.target [Service] Type=simple User=root Group=root ExecStart=/data/weed/weed -v=0 s3 -port=8333 -filer=localhost:8888 -config=/data/weed/config.json WorkingDirectory=/data/weed SyslogIdentifier=seaweedfs-s3 [Install] WantedBy=multi-user.target
随后运行以下命令开启服务:
1 2 3 systemctl daemon-reload systemctl start weed-s3 systemctl enable weed-s3
使用方法
UI
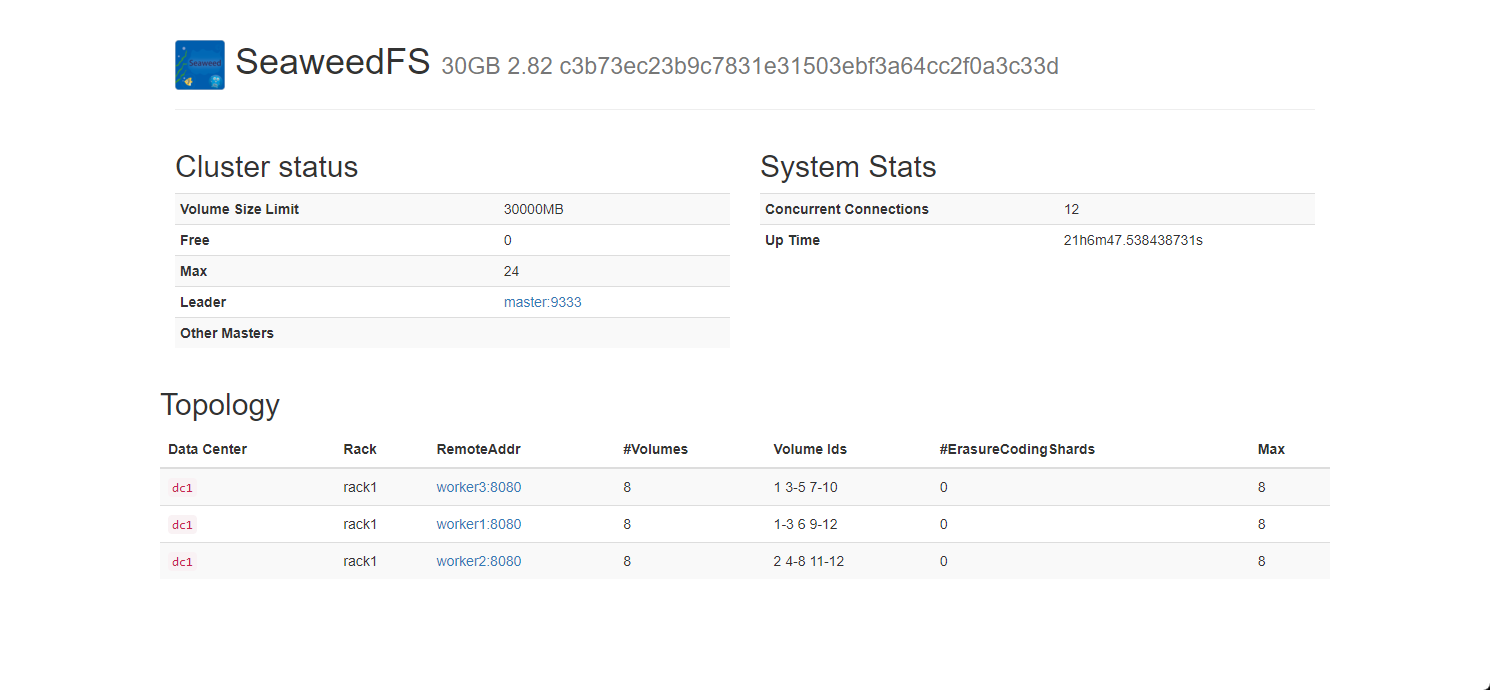
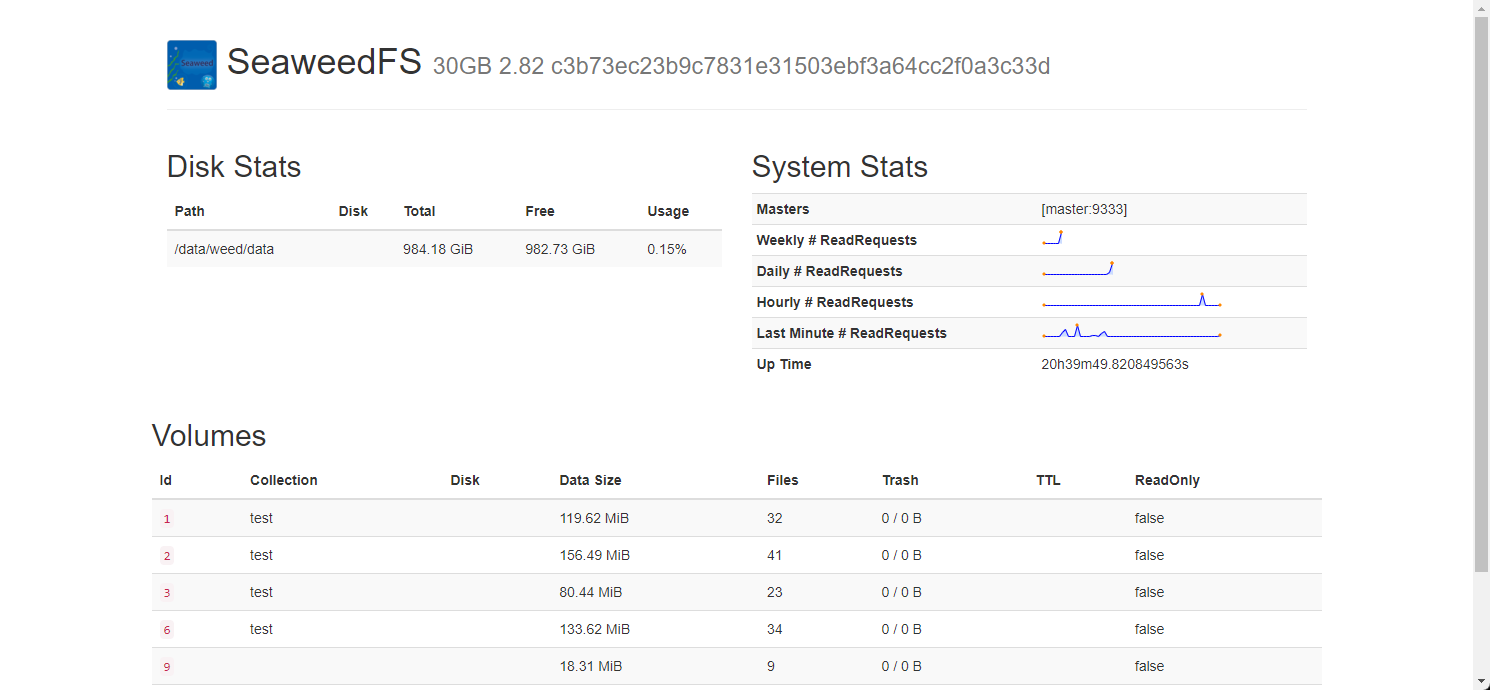
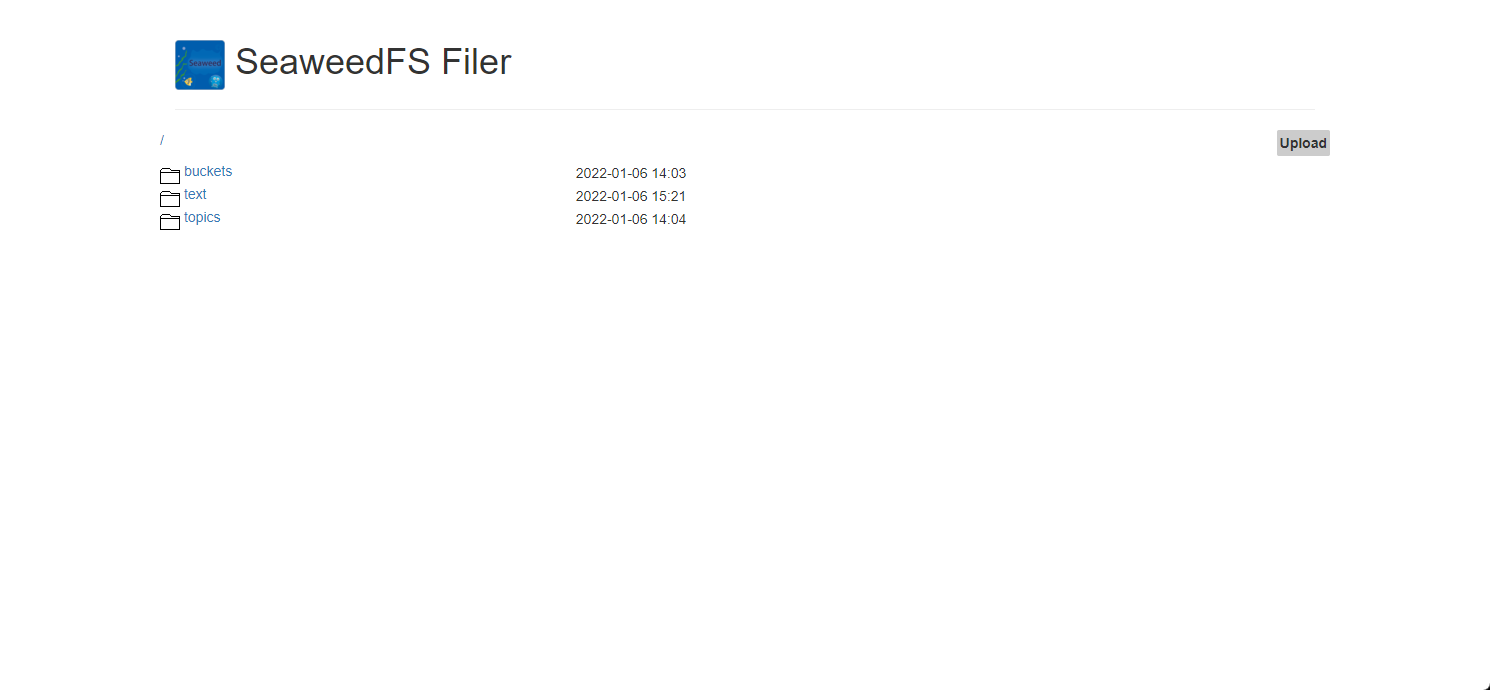
以下UI可以访问:
相关截图显示如下:
使用weed
以下是使用weed命令上传与下载出现的结果:
1 2 3 4 5 $ /data/weed/weed upload /data/weed/weed [{"fileName" :"weed" ,"url" :"worker1:8080/12,ce488bc6ce" ,"fid" :"12,ce488bc6ce" ,"size" :82229387}] $ cd ~; mkdir weed-test; cd weed-test $ /data/weed/weed download 12,ce488bc6ce
使用curl
以下只展示命令和结果:
1 2 3 4 5 6 7 8 9 10 11 12 13 14 15 16 17 18 19 20 21 22 23 24 25 26 27 $ cd ~/weed-test; echo "hello world" > hello.txt $ curl http://master:9333/dir/assign {"fid" :"10,e4e7c9db81" ,"url" :"worker1:8080" ,"publicUrl" :"worker1:8080" ,"count" :1} $ curl -F [email protected] http://worker1:8080/10,e4e7c9db81 -v {"name" :"hello.txt" ,"size" :12,"eTag" :"f0ff7292" ,"mime" :"text/plain" } $ curl http://worker1:8080/10,e4e7c9db81 hello world $ curl -X DELETE http://worker1:8080/10,e4e7c9db81 {"size" :43} $ curl http://master:9333/cluster/status?pretty=y { "IsLeader" : true , "Leader" : "master:9333" , "MaxVolumeId" : 12 } $ curl http://master:9333/dir/lookup?volumeId=12 {"volumeOrFileId" :"12" ,"locations" :[{"url" :"worker1:8080" ,"publicUrl" :"worker1:8080" },{"url" :"worker2:8080" ,"publicUrl" :"worker2:8080" }]} $ curl -F [email protected] http://worker1:8888/text/ {"name" :"hello.txt" ,"size" :12} $ curl http://worker1:8888/text/hello.txt hello world $ curl -X DELETE http://worker1:8888/text/hello.txt
使用s3cmd
首先安装S3cmd:
1 2 yum install -y epel-release yum install -y s3cmd
然后编辑$HOME/.s3cfg,其中Worker IP可以是任意配置了S3网关的节点:
$HOME/.s3cfg 1 2 3 4 5 6 7 8 9 host_base = [worker1]:8333 host_bucket = [worker1]:8333 bucket_location = us-east-1 use_https = False access_key = testak secret_key = testsk signature_v2 = False
试着新建桶并上传文件:
1 2 3 s3cmd mb s3://test s3cmd put /data/weed/weed s3://test/ s3cmd ls s3://test
也可以使用其他S3工具或客户端。
使用HDFS Client
这部分参考了官方Wiki 。这里假设你已经有一套可用的Hadoop集群。
首先在这个地址 下载相应的jar包,随后将它放入Hadoop classpath:
1 2 wget https://repo1.maven.org/maven2/com/github/chrislusf/seaweedfs-hadoop3-client/2.84/seaweedfs-hadoop3-client-2.84.jar cp seaweedfs-hadoop3-client-2.84.jar $HADOOP_HOME /share/hadoop/common/lib/
然后输入以下命令进行测试:
1 hdfs dfs -Dfs.defaultFS=seaweedfs://worker[1-3]:8888 -Dfs.seaweedfs.impl=seaweed.hdfs.SeaweedFileSystem -ls /
可以修改$HADOOP_HOME/etc/hadoop/core-site.xml,让默认值指向SeaweedFS:
$HADOOP_HOME/etc/hadoop/core-site.xml 1 2 3 4 5 6 7 8 9 10 11 12 13 14 15 16 17 18 19 20 21 22 23 <configuration > <property > <name > fs.defaultFS</name > <value > seaweedfs://worker[1-3]:8888</value > </property > <property > <name > fs.seaweedfs.impl</name > <value > seaweed.hdfs.SeaweedFileSystem</value > </property > <property > <name > fs.AbstractFileSystem.seaweedfs.impl</name > <value > seaweed.hdfs.SeaweedAbstractFileSystem</value > </property > <property > <name > fs.seaweed.buffer.size</name > <value > 4194304</value > </property > <property > <name > fs.seaweed.volume.server.access</name > <value > direct</value > </property > </configuration >
重启Hadoop集群,即可正常使用。如果出现以下错误:
1 java.io.IOException: java.util.concurrent.ExecutionException: java.io.IOException: assign volume: rpc error: code = Unknown desc = no free volumes left for {"replication":{},"ttl":{"Count":0,"Unit":0}}
可以尝试在weed-master服务的启动脚本增加参数:-volumeSizeLimitMB=512,减小volume容量,然后再weed-volume服务的启动脚本增加参数-max=0,让系统自行决定此参数。修改完服务脚本后要做daemon-reload与restart操作,可以在UI查看变化是否生效。